How to manage multiple GitHub accounts on a single machine


There comes a time when you may need to manage multiple GitHub accounts on the same machine. For me, it was when I a client I was providing services to moved from bitbucket over to GitHub. I suddenly needed to access my own GitHub as well as theirs from my dev box.
I hadn’t done this before, but surely it would be easy? Right? Well, it’s not difficult, but it’s also not as straight forward as you might expect, even more so if you work primarily on a windows machine.
The standard way to enable multiple GitHub logins on a single machine is to generate multiple SSH keys and alias the repo’s URL. First things first.
Generating the SSH Keys
Before you attempt to generate an SSH key, you should check for any existing SSH keys on the machine. If you are on a Mac/Linux, this can be achieved by running ls -al ~/.ssh; this command will list out of the existing and private key pairs if any exist.
If you are on windows like myself, then the keys exist in:
C:\Users\<username>\.ssh\If the default key pair exists ~/.ssh/id_rsa, this can be used. Otherwise, we can generate a default by running:
ssh-keygen -t -rsa -C "your email address."- -t stands for ‘type’
- -C is for comment
You can run the command without passing in a comment; when you run the following, you’ll see the following: * if you are on windows and see an error, scroll down *
Generating public/private rsa key pair.
Enter file in which to save the key (/c/Users/<your_username>/.ssh/id_rsa):
Copy and paste the path /c/Users/<your_username>/.ssh/ and add a unique file name i.e. /c/Users/<your_username>/.ssh/id_rsa_githubPersonal
Make sure that you do not override the existing id_rsa, as this is your existing key, which you may have set up for GitHub or some other ssh connection
you will then be prompted for a passphrase
Enter passphrase (empty for no passphrase):
Enter same passphrase again:
You can enter a passphrase, or you can press ‘ENTER’ twice to leave it blank.
you can check the folder c:/Users/<your_username>/.ssh/ on windows or for mac/linux run ls -al ~/.ssh
- ls list all the files in the current directory
- a is for listing all of the files, including the hidden ones
- l is for a listing in a long format
You should get an output somewhat similar to this:
total 46
drwxr-xr-x 1 your_username 1049089    0 Jan 26 10:40 .
drwxr-xr-x 1 your_username 1049089    0 Jan 23 12:12 ..
-rw-r--r-- 1 your_username 1049089 3309 Nov 30 11:21 id_rsa
-rw-r--r-- 1 your_username 1049089  547 Nov 30 11:21 id_rsa.pub
-rw-r--r-- 1 your_username 1049089 2675 Jan 26 10:40 id_rsa_githubPersonal
-rw-r--r-- 1 your_username 1049089  254 Jan 26 10:40 id_rsa_githubPersonal.pub
-rw-r--r-- 1 your_username 1049089  399 Nov 30 12:08 known_hosts
Either via the console or from the folder view, you should be able to see the new SSH key file that you’ve just created. as you’ll see above, I have two files, id_rsa_githubPersonal and id_rsa_githubPersonal.pub
id_rsa_githubPersonalthis is your private key, which is stored on your machineid_rsa_githubPersonal.pubthis is your public key. This is the one we’ll give to GitHub
Before we move on, here’s how to fix this error when running this on windows.
‘ssh-keygen’ is not recognized as an internal or external command
So I ran ssh-keygen and got “‘ssh-keygen’ is not recognized as an internal or external command”, I had git for windows installed, my PATH variable was set properly. (make sure your PATH variable has C:\Program Files\Git\cmd)
Yet, still, the command would work.
For the command to work, you need to have ssh-agent started. I had a quick looking in services.msc and couldn’t see any service named ssh-agent or anything similar, now I was being a doughnut. It’s not uncommon. I fell back to Powershell: Start-Service ssh-agent
If you don’t want to be a doughnut like I was when looking in services.msc, look for OpenSSH Authentication Agent
That, however, resulted in:
Unable to start ssh-agent, error :1058This error is because while ssh-agent is installed, the service isn’t started. To prove this, you can run the following:
> Get-Service ssh-agentYou should see something like this:
Status   Name               DisplayName
------   ----               -----------
Stopped  ssh-agent          OpenSSH Authentication Agent
Ok, so it’s stopped. Actually, mine was disabled, which you can see by running:
> Get-Service ssh-agent | Select StartType

StartType
---------
Disabled
To start the service, run the following:
> Get-Service -Name ssh-agent | Set-Service -StartupType Manual
> Start-Service ssh-agent
This can all be done in the GUI; make sure to look for OpenSSH, not SSH Agent like I did.
Now in a new console window, if you type ssh-keygen it suddenly works!
Adding your new SSH key to the GitHub account.
Now that we’ve generated the public SSH key, we need to add it to your GitHub account.
First things first, we need to copy the public key, on windows open c:/Users/<your_username>/.ssh/id_rsa_githubPersonal with your favorite text editor. I suggest VsCode.
On Linux/Mac, you could use atom ~/.ssh/id_rsa_githubPersonal; the text editor you use is entirely your choice.
When the file is opened, it should look something similar to this:
ssh-rsa AAAAB5hgxC1yc2EAAAADAQABABABAQDEmSbc7ms4TFIf7G0e9EqdrQRTB17VFTqRtCbQ55sSc11xZP5B07UXf9+................a955cf1GUzsNIr60E7VuVxirrr+K2.............nDEg1H/VbyJtEekh4Aav9csQw3r7y test@codewithadam.comThe key is longer than this, but I’ve shortened it and randomized it a bit for the tutorial.
To add this to your GitHub account, go to your Github account -> Settings -> SSH and GPG keys
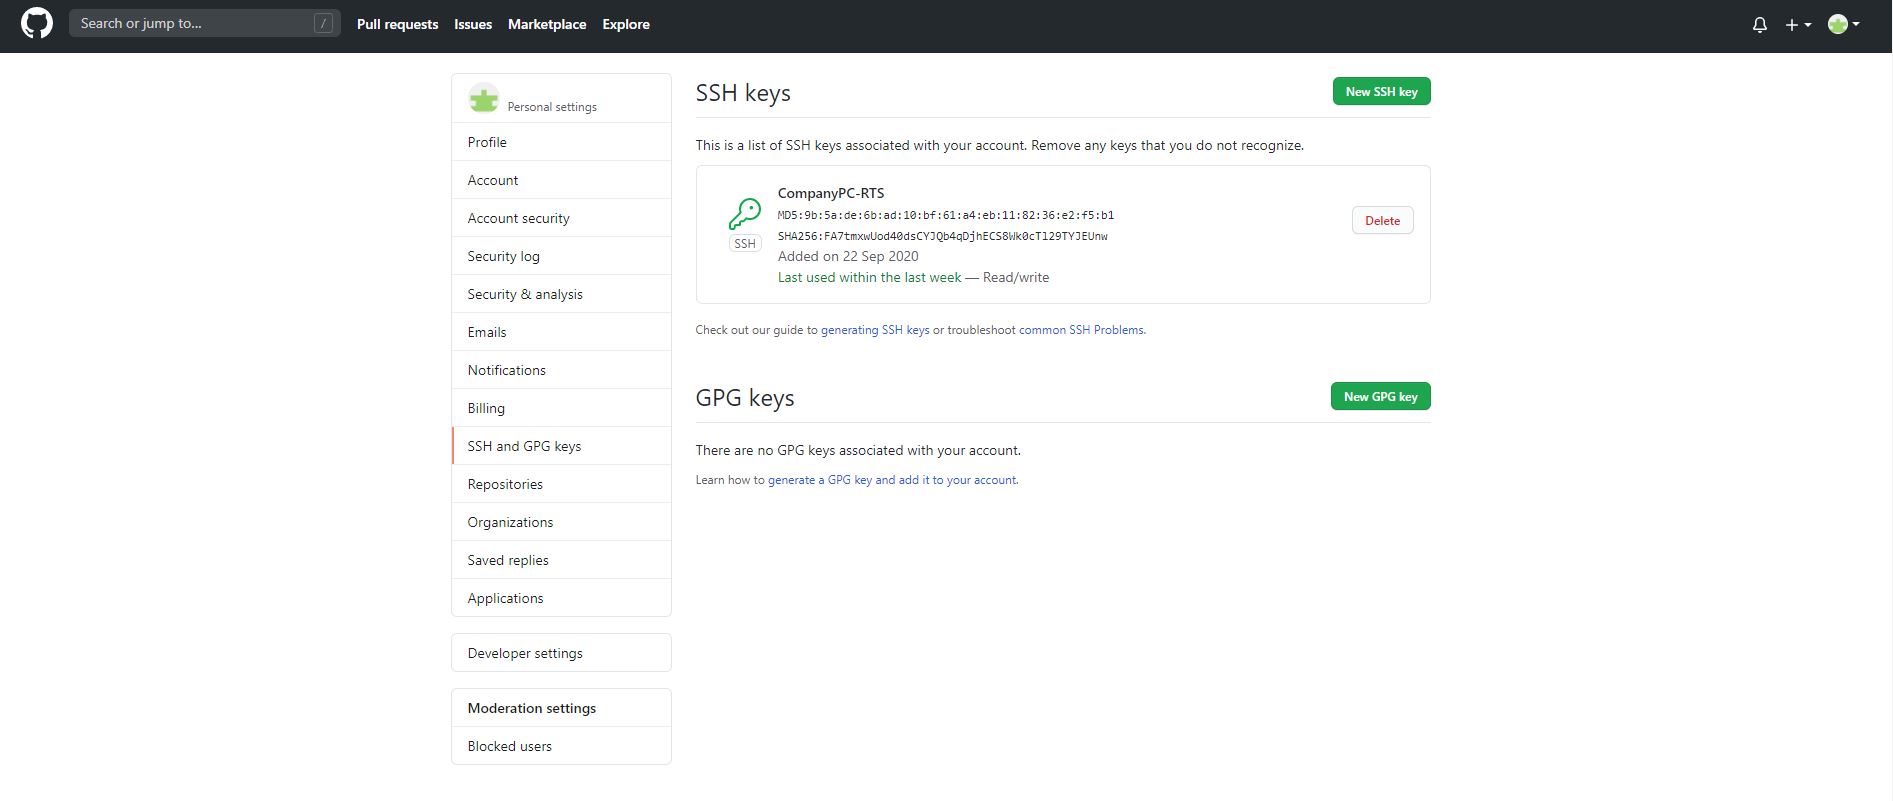
Click on the New SSH key button.
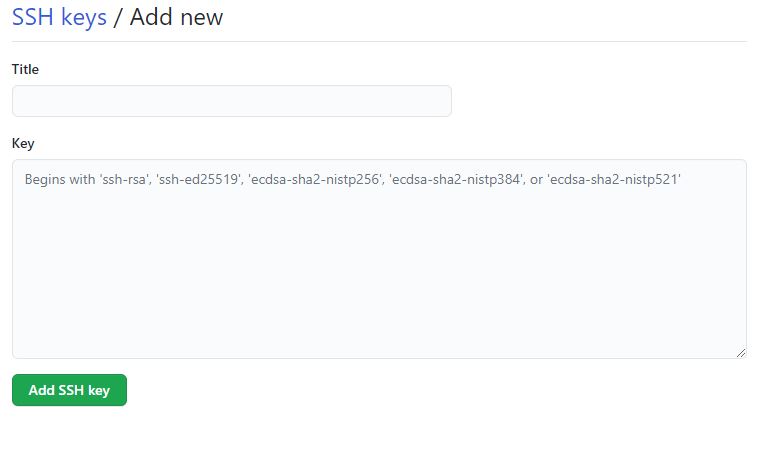
Give your new SSH key a title, and then paste the new SSH key you copied earlier. I suggest naming your keys after the machine they are from and the purpose, i.e., personal, company, etc.
Registering the new SSH Key with ssh-agent
Now that we’ve created a key and added it to GitHub, we need to add it to our SSh agent. and this can be done by running:
ssh-add ~/.ssh/id_rsa_githubPersonalwindows:
ssh-add c:/Users/<your_username>/.ssh/id_rsa_githubPersonalNow we have two choices as to how we want to work with the SSH keys going forward. First, we’ll cover the SSH configuration file. Secondly, I’ll show you how to have only one SSH key active in your ssh-agent at any one time.
Creating the SSH config file
In this file, you can specify different SSH configuration rules for different hosts, depending on the host in use will determine which SSH key to use.
The SSH config will live at ~/.ssh/ or c:/Users/<your_username>/.ssh/ and is a file called config. To create this file, you can use a few methods such as $ touch config, but I tend to use vs code so $ code config
This is where the magic happens. Update the config file to use your SSH keys like so:
# Personal account
Host github.com
   HostName github.com
   User git
   IdentityFile ~/.ssh/id_rsa_githubPersonal

# Client account
Host github.com-clientX
   HostName github.com
   User git
   IdentityFile ~/.ssh/id_rsa_githubClientX
clientX is the GitHub user id for the client I am providing services to.
By using github.com-clientX as a notation, It can be used to differentiate the various Git accounts. However, you can also use “clientx.github.com”. I suggest being consistent with whatever notation you use. This becomes very relevant when you clone a repository or update the remote origin URL.
The configuration above tells the ssh-agent to:
- use id_rsa_githubPersonal for any git URL that uses @github.com
- use id_rsa_githubClientX for any git URL that uses @github.com-clientx
One SSH Key active in ssh-agent at any one time
This approach doesn’t require an SSH config file. Instead, you’ve manually ensured that the ssh-agent has only the relevant active ssh key attached for your GIT operations.
ssh-add -l will list all the SSH keys attached to the ssh-agent at that moment in time. You would then remove all but the one you want to use. The easiest way to do this is to remove them and then re-add the key you want to use. You can do this like so:
$ ssh-add -D            //removes all ssh key entries from the ssh-agent
$ ssh-add ~/.ssh/id_rsa_githubPersonal                 // Adds the relevant ssh key
The ssh-agent now only has the key that’s mapped to my personal GitHub account. When I do a git push to my personal repository, it will use that key.
If I need to push to my client’s repository, then I’ll need to rerun the command but this time specifying the client’s key.
$ ssh-add -D
$ ssh-add ~/.ssh/id_rsa_githubClientX
Setting the git remote URL on the local repositories
for the repositories that already exist on your machine, you can update the URL by running the following command:
git remote set-url origin git://<hostname>/<path to repo>.git

i.e.

git remote set-url orgin git://github.com-clientX/ClientX/AllTheCodes.git
Make sure to set the git username and email in each repo, which can be done by going into the repo and running git config user.name and git config user.email.
git config user.name "user x" // updates the git config username
git config user.email "userx@client.com" // updates the git config email
if you’ve done a git init then to set the remote URL, you can use the following
git remote add origin git@github.com-clientX/ClientX/AllTheCodes.git
Obviously, making the changes to match your SSH config and git URLs.
Just make sure that the string between the @ and : match the host you specified in your ssh config.
You can then push your initial commit to your GitHub repo.
git add .
git commit -m "Initial commit"
git push -u origin master
setting the host while cloning repositories
Like the above step, when we clone a repository for the first time, we can change the host to match the ssh key we want to use.
So hop into GitHub and grab the SSH clone URL; it’ll look something like this:
git clone git@github.com:personal_account_name/repo_name.git
update it to tie into the ssh-key
git clone git@github.com-clientX:acct_name/repo_name.git
The change I’ve made here is to update the host to match the name that I’ve set in the SSH config. The string between @ and : should match the SSH config.
Wait… I can’t use SSH Keys; GitHub config blocks it.
Ah… Welcome to my world.
After completing all of the above myself, I went to pull the latest from the client’s repository to be faced with an error stating that the use of SSH keys was prohibited and would need explicit approval.
My client had decided that personal access tokens were the way forward and that SSH was a no go. Fortunately, that has worked out well for me.
My personal GitHub Repos all use SSH and the methods I’ve detailed above; my current client uses personal access tokens, so I authenticate with GitHub over HTTPS using my email as my username and the personal access token as the password.
If you go to Your GitHub Account -> Settings -> Developer Settings -> Personal Access tokens, you can generate a new token there.
When you try to pull/clone on windows, you’ll get a popup asking for your username and password; enter your email and then the personal access token as the password. This will be stored in your credential manager.
This is what I’ve done, and it works very well. One caveat is that while you can add multiple entries within the credential manager (hit windows key and type Credential Manager, or enter it into the search bar), only one of them will work; the other won’t, so you can have both your personal and client credentials in the credential manager. Though I didn’t test out whether by modifying the host as we do above for the SSH config, whether that would work…
I get “remote: Repository not found” when I try to use the personal access token
This happens because you already have a GitHub credential cached in your system. That token doesn’t have access to the repositories you are trying to access. As above, open Credential Manager and update the credentials.
Wrap Up
Hopefully, this has helped you get your git all set up to work with multiple accounts. I know that I am happily working away with no problems now. I had hoped to find something like google where I can be logged into multiple email accounts at the same time, being able to open them all independently. Unfortunately, this isn’t something that GitHub supports. Instead, I ended up creating a new profile in Chrome and using that for the client-specific logins.